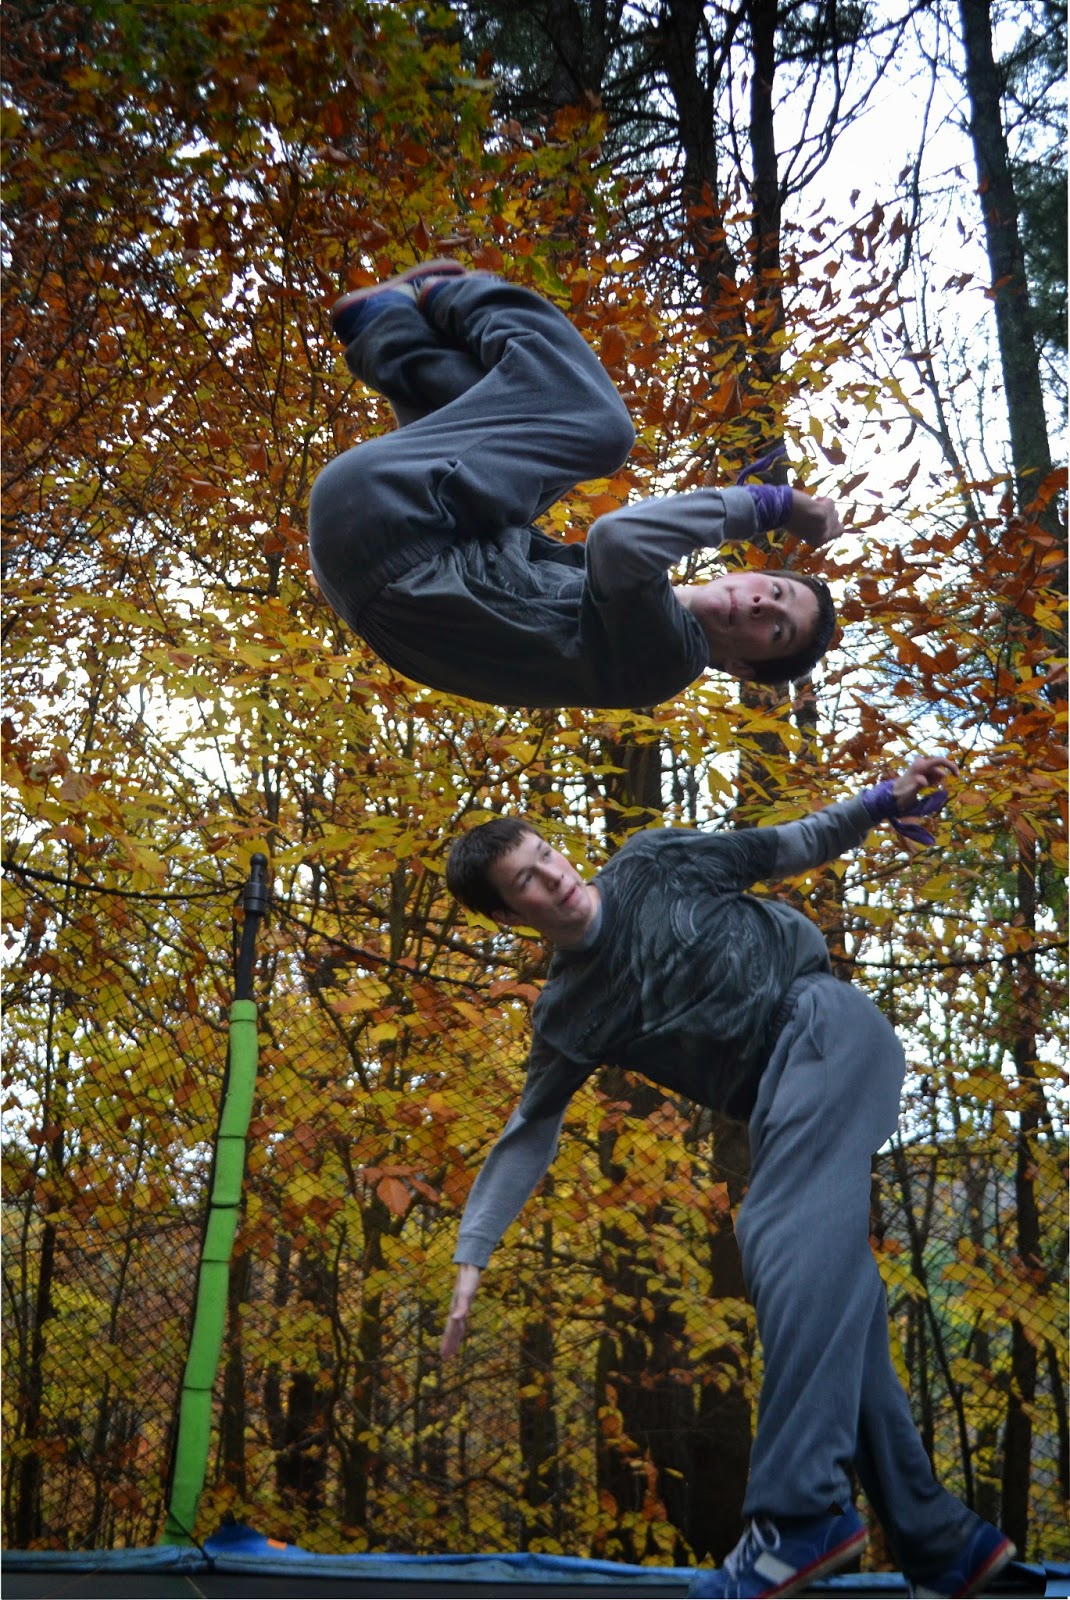
Friday, October 31, 2014

Two Part Flip - Vertical Sequence Shot


F-Stop: f/3.8
Shutter Speed: 1/640
ISO: 800

This sequence shot is two vertical action shots of me put together, one of me at the apex of my flip and one at the very beginning. These two photos are not of the same flip and logically speaking the movement of the two flips don't match. Regardless of this little error, I chose these two photos because they are both shots that I loved and I wanted to show case both of them. I used a layer mask to allow the subject of the second photo to show through the background of the first photo, thus having both subjects present on a single background in a single photo.

They compliment each other very well; the frozen action of my twisting body just about to leave the trampoline and the frozen action of my twisting body in mid air. I absolutely love how you can clearly anticipate the action of flipping from my about to flip and you get to see the final result of that action captured in mid air. The dynamics between these two photos that I merged together is wonderful and it would be my second pick to be printed.

Jump! x3 - Vertical Sequence Shot


F-Stop: f5.6
Shutter Speed: 1/500
ISO: 1600

This shot is 3 photos merged together in photoshop. I didn't take these three pictures with the intent to make a sequence shot so there is quite a bit of clipping between the 3 subjects. This took lots of editing to properly draw each of the 3 bodies into the same picture without harsh edges and lost details in the clipping. The high ISO produced a little bit of grain but the more important aspect of the photo is the frozen action, so it doesn't deduct much from the overall composition.

Thursday, October 30, 2014

Cartwheels - Horizontal Sequence Shot


F-Stop: f/5.0
Shutter Speed: 1/640
ISO: 1600

This is my sequence shot with more than 5 frames. I did many other sequence shots but they had 2-3 frames, which wasn't the requirement for the main sequence shot. I like this sequence shot because it does capture the whole action of his cartwheel. Due to clipping issues I had to cut a few pictures so the action is just a bit more spliced then I would have liked. I also now realize that I should have had my brother take a more parallel path to the camera so he could have stayed in focus the whole time. On the right side of the photo he starts to get blurry and thats because my camera was focused for a single distance and his distance changed as he did his action.

Using photoshop I merged the photos together into one document. I then used the layer mask to make holes in each photo, going sequentially down, so the subject of each photo could be visible with the background of the first photo.

Wednesday, October 29, 2014

Flips within Spirals - Rotational Pan Shots


F-Stop: f/18.0 - 10.0 - 13.0 (respectively)
Shutter Speed: 1/400
ISO: 800

These were by far my favorite shots to take. Between me and my brother with came up with the idea to take pan shots with a rotational pan as opposed to a horizontal or vertical pan. We took roughly 150-200 shots and only 3 of them seemed decent. Because of the difficulty of syncing me rotating the camera with my brother flipping, taking a picture while he was at the apex of his jump, and taking a picture while the frame was relatively parallel to the ground, it was extremely difficult to get a decent shot.

The spiral of leaves created by spinning the camera is quite beautiful and it is also really cool have my brother captured in the middle of it. Though he is blurry in all of the pictures, I found that the effect of the spiralled background makes up for it. Normally I wouldn't be satisfied with the blurry image but given the uniqueness of the composition I decided to be proud of these three photos and upload them.

Blurred Bike - Horizontal Pan Shot


F-Stop: f/22.0
Shutter Speed: 1/30
ISO: 800

This photo is a horizontal pan shot of one of my brothers on his bike. The basis of a pan shot is to use a longer shutter speed and match your camera with the movement of your subject, thus blurring the background and keeping the subject in focus. He rode around the house multiple times and zoomed around the corner so I could get a shot I was satisfied with. Pan shots require many more takes than normal shots, though in this case I had the luxury of repeated sustained action. I sat down on the ground and go relatively low so the angle of the pan was always looking up or at least even with my subject.

 The effect created by the pan shot is really cool in this picture. The haze of vibrant fall colors, enhanced by editing in camera raw, adds a colorfully exciting representation of the movement. The slight blur on the wheels of the bike and on my brothers feet creates another layer of movement. This leaves just the body of both the bike and my brother in focus. I also cropped the photo to excluded extremely bright areas on the left and to place my brother in the composition in a way that complimented the rule of thirds better.

Colorful Action - B&W with Color


F-Stop: f/9.0
Shutter Speed: 1/800
ISO: 1600

This is my black and white with color shot. I captured the action of a basketball going through the hoop and I chose to emphasize it with the selective coloration technique. I applied a layer mask through the hue and saturation menu that desaturated the whole photo. Because the desaturation was applied with a mask, I was able to go back and paint in which areas I wanted to have colored. Using the magic wand to initially apply the mask I was able to already color much of the hop and intricate parts of the net. I then went back over everything and refined the edges because the magic wand had roughly selected them. I also painted in the excluded areas that the magic wand didn't grab. The final product is a frozen action shot that has an added element of drawing your attention immediately to the action because it is the only part of the composition with color.

Tuesday, October 28, 2014

A Pause in the Action - Journal 9


F-Stop: f/22.0
Shutter Speed: 1/400
ISO: 1600

During my action photography shoot on Saturday I paused for a moment to capture these sun star bursts. Using the maximum aperture I captured the bursting effect of the sun. Flares were also created, which I thought look especially cool. The larger one is a soft blue splotch and the smaller one is predominately purple rainbow splotch. I loved how I captured this more peaceful calm photo in the middle of all the crazy action photography.

Tuesday, October 21, 2014

Down by the River - Journal 8


F-Stop: f/4.8
Shutter Speed: 1/15
ISO: 100

This photo was a reject for the nature and landscape project. I did use the best photo out of the photo set with the cairn as the subject and but this was another photo I liked. I liked how the rocks that the cairn is set on carry your eye back into the photo and out of the corner. The low aperture keeps just the cairn in focus so the rock patterns in the background are not distracting.

Friday, October 17, 2014

Hogback Panorama v.1 - Panorama


F-Stop: f/22
Shutter Speed: 1.6
ISO: 100

This was the first panorama that I took out of two. I had to fill in spots on the bottom were content was missing with bottom the content aware fill tool and the clone stamp. The fill tool left some areas looking a little funky so I zoomed close in and clone stamped things till it looked natural. The colors of this panorama are not very breathtaking so I enhanced them a little bit and also made the sky more dark. The white balance to this photo is rather cool/neutral when compared to the second one. This effect makes the colors a lot more crisp.

Hogback Panorama v.2 - Panorama


F-Stop: f/22
Shutter Speed: 1.3
ISO: 100

This was the second of two panoramas that I took. Upon cropping there were a few areas near the bottom corners that had transparent pixels. I used the content aware fill tool to fix those areas and avoiding cropping out wanted details. Using the camera raw editor, I enhanced the colors of the trees and darkened the sky so the mountain range was more visible. This panorama has a warmer white balance to it then the first one.

Thursday, October 16, 2014

Fall on Hogback v.1 - Vertical HDR Landscape


F-Stop: f/22
Shutter Speed: 1/4th
ISO: 100

This is a vertical HDR that I took on top of Hogback. I didn't pop the colors on this landscape as much as the other one but I still like the shot. It has some of the blur effect that was in my other landscape but it was not as windy during this shoot as it was during the other one. Again I used a high aperture so I could have the greatest amount of detail in the photo.

One aspect of this photo that I really like is how the mountains disappear into the clouds. I wish that the clouds had a more interesting pattern than just the plan white. I was able to edit my photo and pop the details of the clouds and trees as much as I could but still desired more details in the clouds.

Fall on Hogback v.2 - Horizontal HDR Landscape


F-Stop: f/22
Shutter Speed: 1.0
ISO: 100

I composed this HDR landscape shot on the top of Hogback. It was a very rainy day and not the best conditions for making an HDR but I made one anyways as to accentuate the colors of the trees and sky. The mountain range in the background doesn't have as much detail as I would have liked but I am very happy with the colors in the trees.

To take an HDR requires a constant aperture. I used the highest aperture of 22 so my whole picture could have full detail. The shutter speeds varied but most of them were multiple seconds long. Because of this, and the wind, the trees in the front were captured with quite a few ghosts. I really liked the blur effect even though I wasn't deliberately trying to pull it off.

When editing this I tried to make the colors of the trees pop while still retaining the mountain range in the background. It was very hard to see in the first place but this HDR provided a lot more detail than any single shot I took.

Tuesday, October 14, 2014

Ghost Water - Journal 7


F-Stop: f/11
Shutter Speed: 1.0
ISO: 100

This photo was not one that I chose for my project but still liked. I did a quick raw edit to adjust the white balance of the picture. It was slightly warmer and I found that a cool white balance fits photos of water a lot better. I liked the ghost/soft water effect that was created by the second long exposure. I had a relatively high aperture as to capture the detail of everything. 

Friday, October 10, 2014

Sun Star Burst - Black & White Conversion


F-Stop: f/22
Shutter Speed: 0.6
ISO: 100

I took this photo the day after my rain shoot. The smudge on the screen is from the previous shoot were a little moisture got inside the camera and fogged up the lenses. This prevented me from taking any vast  landscape shots but I think it worked out with this photo. The star burst effect from the sun makes it look like the smudge is sun glare on the lenses instead of just a smudge.

The high aperture allowed for great detail in everything and enable the burst effect on the sun. The detail, though it's shown in a grey scale, still has a presence because there was so many different intensities of light on the leaves throughout the picture. The 0.6 second long exposure created a slight amount of blur on all the leaves because it was windy out. This movement by the wind did allow different angles of the sun so lots of texture was created.

Rain & Dew - Vertical Close Up


F-Stop: f/5
Shutter Speed: 0.3
ISO: 100

My rainy afternoon of photography allowed for many opportunities for rain based photos. My attempts to capture running water wasn't going all that well so I settled for the the water that had condensed and settled out the plants outside of my house. From the cover of the front porch, using a telephoto lens I captured multiple shots of the plants from my limited vantage point. This picture was my favorite because the drops of water are both clearly visible/ in focus and blurry in the back/foreground.

The low aperture creates a blurred back/foreground in my photo and highlights the important water drops on the middle plant. Editing in camera raw, I enhanced the vibrant colors of the plant and worked to buff the clarity and detail of the in focus plant. I also adjusted the white balance to highlight the water and pop the green of the plant.

Using photoshop I took the created a pattern out of the image. By copying it four times and arranging it in different orders I achieved a variety of mirror like effects.

Stream - HDR


F-Stop: f/22
Shutter Speed: 8.0
ISO: 100
I took this HDR the day after all the other photos. During the previous days shoots moisture got into the lens and it had fogged it up a bit. The smudge is visible in the middle of the stream. I tried to remove it and smooth it out with photo shop using the clone stamp and selecting the area and using the fill with aware of content, but neither worked well. I left it as is and focused on balancing the highlights and shadows that were in the photo.

The top half of the picture is very golden and yellow whereas the bottom half is a darker green color. I had even exposures for each of the two distinct areas so I was able to get detail in both the bright upper half and the darker lower half. While editing I chose the setting that shows when details are being clipped. I played around with the levels of highlights, shadows, whites, and blacks till all the clipping issues had just barely disappeared. This allowed for the best level of detail before things started getting clipped off.

I would like to take another HDR sans smudge and see if I am more happy with that one. If I can't get around to shooting a second one this one will have to do. I was able to learn about the process of creating an HDR and got to practice those skills so even though I'm not completely satisfied with my outcome it was definitely a learning experience.

Waterscape - Soft Water


F-Stop: f/11
Shutter Speed: 3.0
ISO: 100

I took this picture around 3:30 p.m while it was raining. The small brook I photographed was running a little higher and faster than normal because of the rain so it made for some interesting water effects. Using a 3.0 second shutter speed, I allowed the camera to capture the ghosty effect of the water. While the leaves and rocks are static, the water is moving, so while the shutter is open the waters movement is captured.

Using camera raw I enhanced the dull colors of the leaves and grass and added a more blue tint to the photo; there was a really warm orange light in the picture but it didn't fit the cool running water. The blue tint is visible in the water slightly were the white ghosts have appeared because they look slightly blue.

If I could capture this photo again I would have liked to have had a different section of the river. The water was running completely horizontal to the camera, and I think it would look cool if I had the water running both vertically towards the camera and then diagonally/horizontally off to the side. This would allow for a greater variety of the soft water effect.

Cairn - Horizontal Close Up


F-Stop: f/4
Shutter Speed: 1/25
ISO: 100

I took this picture on a rainy day around 2 p.m. It was very overcast so the lighting was very gloomy and moody. I took this picture looking up a slope on the side of a river bank. The camera is slightly tilted but it is generally parallel to the line on the top of the slope. Because of the low aperture setting, only the cairn in the front is in focus and everything else has a slight blur to it.

The cairn in the foreground is actually standing relatively straight up, but because of the angle and slant of the camera it appears like it is about to fall over. It is slanted though, because it comparison to the cairn in the background it looks very titled. The cairn in the background is perfectly vertical, so it gives an odd contrast between the two. Both the cairns are titled slightly inward towards the center so it draws eys backwards.

Using camera raw I enhanced the already moody lighting by adding a cool, blue effect. I sharpened the contrast and tried to highlight the fact that everything was wet and had a slight sheen to it. The effect of the water and wetness adds an almost surreal effect to the picture. I didn't edit it with the intent of this effect because a large part of it is just the natural composition.

Wednesday, October 8, 2014

Andy Socks - Journal 6

I wanted to use a photo from my shoot this weekend for my blog but those pictures are at school and I was not at school today. With a quick, last minute artsy photo in mind, I walked down stairs to find my fat, dumb, but extremely cute and lovable cat Andy lounging on the couch. Using my cellphone I took a close up picture of his eyes. He has lovely eyes and I didn't capture them as well as I'd have hoped to but he got impatient and left. I love the texture of his fur and the reflection and gleam to his eyes.